
|
|

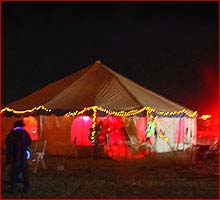
The idea for the rebar hammer came to me during Burning Man 2001 after pounding in some 70 pieces of rebar, between our Round End Marquee Tent (48 stakes alone!), the LiteBrite and our shade structure. By the time I was done I was well knackered and knew there had to be a better way; power tools were the way to go. |
Several months of escalation from simple hammer drills through to demolition hammers led me to the fabulous labour-saving device that is: The Rebar Hammer! |

We took the rebar hammer out to the Playa to set up camp in 2002, and it more than proved itself. We probably hammered a couple of hundred pieces of rebar in our camp, plus we lent it out to our neighbours and made lots of new friends. We also used it to drill 3' holes in the Playa as guide holes for 1.5" stakes which made them much easier to hammer. The LiteBrite Rebar Hammer is capable of driving a 3' length of ½" rebar flush with the Playa in about 10 seconds, with very little effort and no stress on the wrists (an important consideration for any geeks with RSI). You'll have your structures up in a jiffy, and be free to get on with the serious business of partying... I really want to hear the clatter of rebar hammers all over the Playa this year, as I believe our days of sledgehammering are over. Spread the word!
|
|
Here's what you will need:
Let's take a closer look at each of these elements in turn: |
|
|||||||||||


 This is the heart of the tool - a demolition hammer or jack hammer, designed to
deliver reciprocal blows hundreds of times a minute, and usually used for
breaking up concrete. I selected an electric tool as they are generally lighter
and easier to handle.
This is the heart of the tool - a demolition hammer or jack hammer, designed to
deliver reciprocal blows hundreds of times a minute, and usually used for
breaking up concrete. I selected an electric tool as they are generally lighter
and easier to handle.
New demo hammers can run anywhere from $500 to $2000 (or $400 on Amazon, more later), but of course we never buy anything new - in a word, eBay! Demo hammers generally go for somewhere between $200 and $600 on eBay, and if you plan early and watch for a month or two you can probably get a great deal. Our hammer cost us $250.
You do have to make sure that the hammer is powerful enough to do the job. I did some calculations based on my experience hammering in rebar with a small hand-held hammer, and calculated that a minimum impact energy of 5 ft-lbs (about 7J) was needed to ensure that we'd be able to drive into the Playa. This is the equivalent of a 10lb sledgehammer falling 6 inches, delivered about 50 times a second. Subsequent tests on-Playa demonstrated that this is quite sufficient!
Also, if you can afford it, you might find it useful to get a rotary or combo hammer - this is a demo hammer that also serves as a super hammer drill. We purchased a ¾" x 3' masonry drill bit for ours that let us drill holes in the playa to ease the pounding of our Big-Ass-Tent's 1.5" stakes.
If the eBay listing does not include the impact energy, specs for the various brands of demo hammer are available on the manufacturer websites. Here are some links to brands I would recommend:
|
I found that the best keywords to search for on eBay are "demolition hammer -cd" (the "-cd" filters out CDs by the band with the same name), "rotary hammer", and occasionally "jack hammer".
Also, look for a supplied carrying case as these things are heavy and you want to keep them out of the dust as much as possible.
Another criteria to look for when selecting the hammer is the rating of the motor - make sure that you can run it with the generator you plan to use. The hammer I bought has an 8A motor, which means it runs great on my 1kW Honda EU1000i (highly recommended!) generator. More about this later.
If you don't want to bother with eBay and would prefer to buy new (and get warranty protection), Amazon has the DeWalt D25500K on sale for just $399 (MSRP $880) which is a really great deal - wish it had been available when I was shopping! Note that the nominal current rating of 11A is over the EU1000i generator's output, but also that the D25500K has an adjustable output and the maximum setting gives 7.3ft-lbs, well over the 5ft-lbs we used last year. Between lowering the speed/power and not using the rotation for hammering rebar, you should be OK.
 This bit attaches to the hammer and allows it to be used to drive ground rods. It will
cost you about $50 and it is important that you buy the bit after the
hammer as there are several different attachment standards (spline, SDS-Max etc.).
This bit attaches to the hammer and allows it to be used to drive ground rods. It will
cost you about $50 and it is important that you buy the bit after the
hammer as there are several different attachment standards (spline, SDS-Max etc.).
The tool is a hardened steel cup that fits over the end of a straight rod - you'll need a special adpater for bent rebar.
If you live near a White Cap you can pick one up at the counter, otherwise you can shop their website or alternatively purchase a bit at Coastal Tool.
The ground rod driver bit will fit over rebar up to ¾" in diameter.
 Bending rebar into a peg shape means you don't have to cover exposed ends and also makes
it easier to remove. However, if you bend the rebar you can't use the ground rod driver bit
on it, you'll need to make an adapter.
Bending rebar into a peg shape means you don't have to cover exposed ends and also makes
it easier to remove. However, if you bend the rebar you can't use the ground rod driver bit
on it, you'll need to make an adapter.
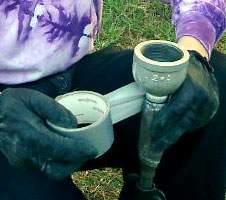
I tried several adapters before I hit on bell couplings. They are used to couple different diameter pipes with NPT threads. Attaching a short length of pipe to the coupling gives an adapter which will fit into the rod driver bit and also fit over bent rebar. Make sure the pipe is shorter than the interior depth of the driver bit, about 3" should be fine.
The largest diameter pipe that will fit into the driver is ½" NPT. I found that the ½" to 1½" bell coupling was perfect for rebar sharply bent to 60° but you may want to find the best coupling for your rebar.
 Attaching the adapter using duct-tape seemed to work well; as long as the pipe is short enough
that the shoulder of the bell coupling is resting on the driver bit then the force is transmitted
efficiently and the duct-tape is only necessary to prevent the adapter from falling off when
you're finished hammering...
Attaching the adapter using duct-tape seemed to work well; as long as the pipe is short enough
that the shoulder of the bell coupling is resting on the driver bit then the force is transmitted
efficiently and the duct-tape is only necessary to prevent the adapter from falling off when
you're finished hammering...
A word of warning - the couplings are made from cast iron so are somewhat brittle and will eventually break, though the one I broke at BM last year must have hammered several hundred stakes. I recommend that you bring several adapters with you just in case...
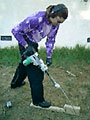
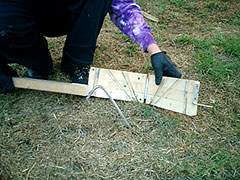
 Holding the rebar stake steady while starting to hammer it in with the tool turned out to
be a major problem - if the stake is not held steady when you turn on the hammer at 50 cycles
per second, it jumps around alarmingly. To prevent this I built an angle guide starter tool
that holds the rebar securely at either 90°, 60° or 45° while it is hammered down.
Holding the rebar stake steady while starting to hammer it in with the tool turned out to
be a major problem - if the stake is not held steady when you turn on the hammer at 50 cycles
per second, it jumps around alarmingly. To prevent this I built an angle guide starter tool
that holds the rebar securely at either 90°, 60° or 45° while it is hammered down.
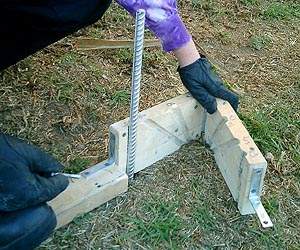
The starter tool is made from several pieces of wood (actually left over from building the LiteBrite) stacked and screwed together. I drilled the resulting block out at different angles and then sawed straight down the middle of the holes. The two halves are attached with a hinge so that I could open one side of the block after the rebar is in a foot or so to allow me to remove it from bent rebar. The bottom piece of wood extends about three feet to give something to stand on to hold the whole thing steady.
I added L-brackets, one on the static side to strengthen the stack, and the other on the swinging side with a corresponding hole on the spine into which a bolt is inserted to hold the assembly closed while hammering.
 1. Close angle guide and place on ground |
 2. Insert stake at desired angle |
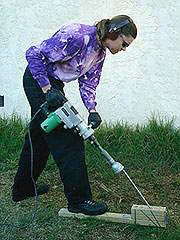 3. Pull the trigger, hammer away! |
 4. Once firmly in, open, remove and finish |
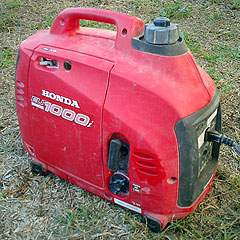 The rebar hammer is of course electric so you'll need a generator. I
found it particularly useful to have a small portable generator that can be moved with the hammer,
especially if you want to lend it to your neighbours (and believe me, they will ask!) - a great
way to meet new friends.
The rebar hammer is of course electric so you'll need a generator. I
found it particularly useful to have a small portable generator that can be moved with the hammer,
especially if you want to lend it to your neighbours (and believe me, they will ask!) - a great
way to meet new friends.
The important thing to look for when matching a generator and hammer is that the power rating is high enough to run the hammer's motor. For instance, I already had a generator, a 1kW Honda EU1000i which can nominally output up to 8.3A at 120V (to get the Amperage, divide the power in Watts by the AC output in Volts - 1000/120 = 8.3A). Therefore, I narrowed my search to a demolition hammer rated at 8.3A or less. The Hitachi DH38YE I bought has an 8A motor and it runs really smoothly hooked up to my generator.
As an aside, I highly recommend the Honda EU1000i for the playa - it's a great little generator if you have low power requirements. In 2001, it powered the LiteBrite and lights and boombox for our camp, and it runs for about 6-8 hours on ½ gallon of gas. It's also really quiet (57dB) and light (30lbs).
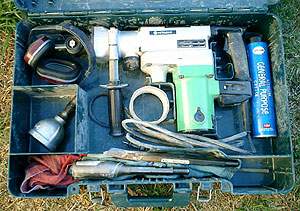 Save your ears! These tools are L-O-U-D!. I found that ours was painfully loud
trying to use it without ear protection, so I keep a pair of ear defenders (muffs) in the
case with the tool. Ear plugs will also work, but are probably not too sanitary on the Playa.
Save your ears! These tools are L-O-U-D!. I found that ours was painfully loud
trying to use it without ear protection, so I keep a pair of ear defenders (muffs) in the
case with the tool. Ear plugs will also work, but are probably not too sanitary on the Playa.
The loud clattering noise will almost certainly get your rebar hammer noticed and you'll get to make lots of new friends - thanks to all our fun neighbours who gave us so much cool swag as thank-yous for us lending them the hammer last year!
As mentioned before, bending the rebar makes it easier to remove, as all it takes is a long piece of pipe or bar slid under the hook to give enough leverage to pull it out."If you don't pull up your friggin' tent stakes and rebar outta the playa, I promise the DPW will GPS your site, track you down, and tar and feather you. Save a tire - pull your stakes."
UPDATE
When I originally posted this page I was designing a rebar removal tool based on a fairly simple hinged head puller using angled grip lock in the upwards direction and quick release downwards. Well, it turns out that there are a number of stake removers on the market using the same basic mechanism - I received many emails from burners with tips on tools available so I just went out and bought one...Amazon has the Tolman Stake Puller for $48 that looks identical to the one we now own.
The DPW have apparently also used The Weed Wrench, designed by fellow Burner CabinBoy... this one is available in several sizes from mini ($82) to heavy ($189) which looks like it can handle really big stakes.
Thanks to Jeff for pointing out the Stake Puller, available in a small size for rebar at $115 or a heavy duty version for $300.
I have received a number of tips from fellow burners on other methods for removing rebar and stakes...
Captain Jack of Picasso Camp writes:
I wanted to pass on a tip for pulling rebar that we've used for several years at Picasso Camp - works well if you don’t have the specialized tools! You don’t push rebar in, you use impact. It comes out easily the same way. Only equipment required is a loop of nylon webbing (or similar material) about 18-24" long, and a small sledge hammer - we usually use a 3-5 pound 'single jack' type short handled one. To remove rebar, simply make a 'clove hitch' loop in the nylon (takes 1 second once you leanr how), and with the sledge hammer 'pound' the stake OUT of the ground by moving the hammer upwards in the opposite direction that the stake is driven in. Usually only 3-5 strokes are required to remove a typical 18-24" piece of rebar. Very easy once you get the hang of it!Glen from Disorient has a good tip for larger stakes (thanks to several other burners who also sent me this tip!):Here's another tip to remove large stakes: I've bolted a 2' piece of chain to the bottom of a hi-lift jack. Hooked rebar can be removed solo by slipping the rebar through a link on the chain, or a loop can be made in the chain with an extra bolt. If the rebar is straight, a second person wraps the chain around the rebar three to four times and pulls the chain taught. Even large stakes pull like buttah! Pulling your neighbors stakes at the end of the burn is almost as popular as driving them in!
If you have any questions or comments please send me an email!
cheers, 


The Universal Translator?